


Table of Contents:
- Plan Your Business
- Create a Shopify Store Account
- Familiar With The Shopify Store Admin Panel
- Set Up Your Store
- How did you add products to the Shopify store?
- How do you add a payment provider to Shopify?
- How to configure shipping settings in the Shopify store?
- How long does it take to set up a Shopify store?
- How do Startbit solutions help your Shopify store?
- Conclusion
Setting up a Shopify store can be a transformative step for your business, enabling you to reach a global audience and streamline your operations. In 2024, Shopify will continue to be a leading e-commerce platform, offering a robust and user-friendly solution for entrepreneurs and established businesses alike.
Since its launch in 2006 as a snowboard gear shop, Shopify has evolved into a leading cloud-based eCommerce platform. Today, it supports over 4 million active websites and has processed sales exceeding $700 billion.
If you’re considering building your own online store with Shopify, this step-by-step guide will help you set up your e-store from the ground up. Whether you’re a tech-savvy professional or a complete novice, Shopify provides all the tools you need to get your store up and running quickly and efficiently.
Join the millions of entrepreneurs who have chosen Shopify to realize their business dreams and begin your eCommerce journey today.
.
Plan Your Business:
Planning your business strategy is crucial before launching your Shopify store. Here are the key steps to consider:
Product Selection:
Select products that not only align with market demand but also resonate with your personal interests. Assess profitability and competition within your chosen niche to ensure viability and differentiation.
Target Audience:
Define your ideal customer base by identifying their demographics, preferences, and purchasing behavior. Understanding your target audience will guide your marketing efforts and product offerings.
Business Name:
Choose a distinctive and memorable name for your store that reflects your brand identity. Your business name should be relevant to your products and resonate with your target audience, making it easier for customers to remember and associate with your brand.
.
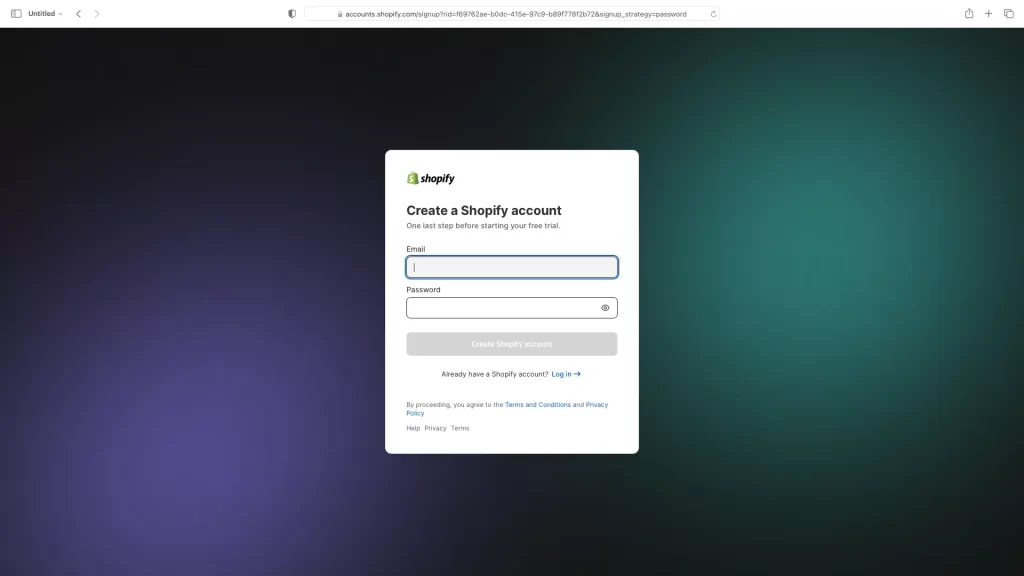
Create a Shopify Store Account:
Visit Shopify’s Official Website:
- The first step is to navigate to Shopify’s official website at www.shopify.com.

Sign Up for an Account:
- Once on the Shopify homepage, locate and click on the “Get Started” button, typically found at the top right corner of the page.
- You will be directed to a signup page where you’ll need to enter your email address, password, and store name. Ensure your store name reflects your brand identity and is easy for customers to remember.
- Click on the “Create your store” button to proceed.
Choose a Subscription Plan:
Shopify offers several subscription plans tailored to different business needs:
- Basic Shopify: Ideal for new businesses or startups looking to establish an online presence.
- Shopify: Suitable for growing businesses with additional features like gift cards and professional reports.
- Advanced Shopify: Designed for businesses scaling up with advanced reporting and third-party calculated shipping rates.
Select the plan that best aligns with your business goals and budget. Each plan varies in pricing and features, so review them carefully before making your selection.
Enter Your Store Details:
- After choosing your plan, you’ll be prompted to enter additional details to set up your store, including your name, address, and contact information.
- Shopify may also ask for details about your business and selling goals to provide tailored recommendations and support.
Start Your 14-Day Free Trial:
- Shopify offers a 14-day free trial period, allowing you to explore the platform’s features and set up your store without any financial commitment upfront.
- During the trial period, you can begin customizing your store, adding products, and configuring settings to prepare for your store’s launch.
Complete the Setup Process:
- Follow the on-screen prompts to complete the setup process for your Shopify account.
- Verify your email address to activate your account and gain access to your Shopify dashboard.
.
Familiar With The Shopify Store Admin Panel:
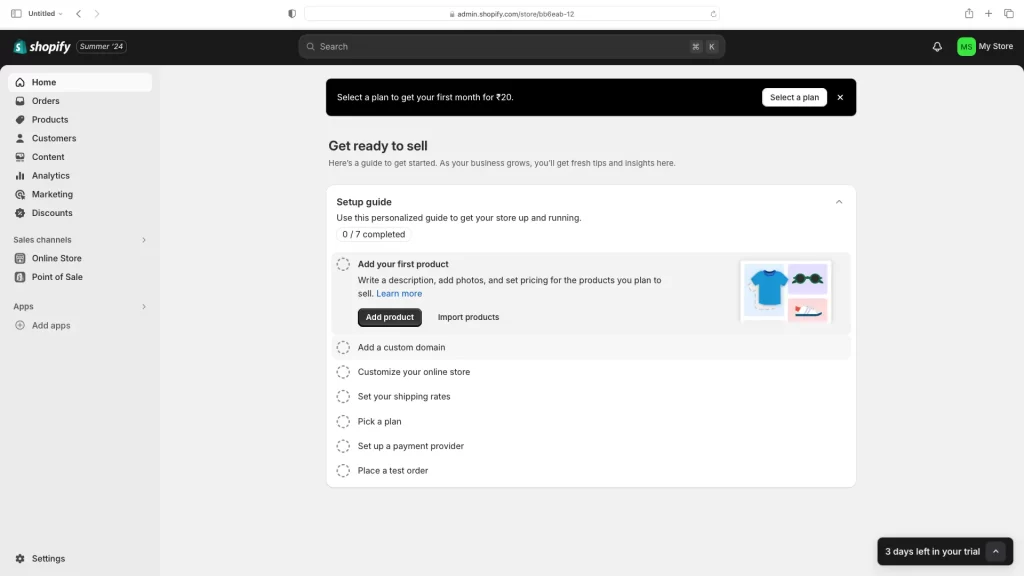
Getting familiar with the Shopify Admin Panel is essential for managing your online store effectively. The admin panel is your central hub for handling all aspects of your Shopify store, from adding products to managing orders and analyzing performance. Here’s a detailed overview to help you navigate and utilize the Shopify Admin Panel efficiently:
Dashboard: The Dashboard is the first screen you see when you log in to your Shopify admin panel. It provides a snapshot of your store’s performance, including:
- Total Sales: View your overall sales for the day, week, month, or a custom date range.
- Online Store Sessions: Track the number of visitors to your store.
- Top Products: See which products are performing the best.
- Recent Activity: Get a quick overview of recent orders, product updates, and other store activities.
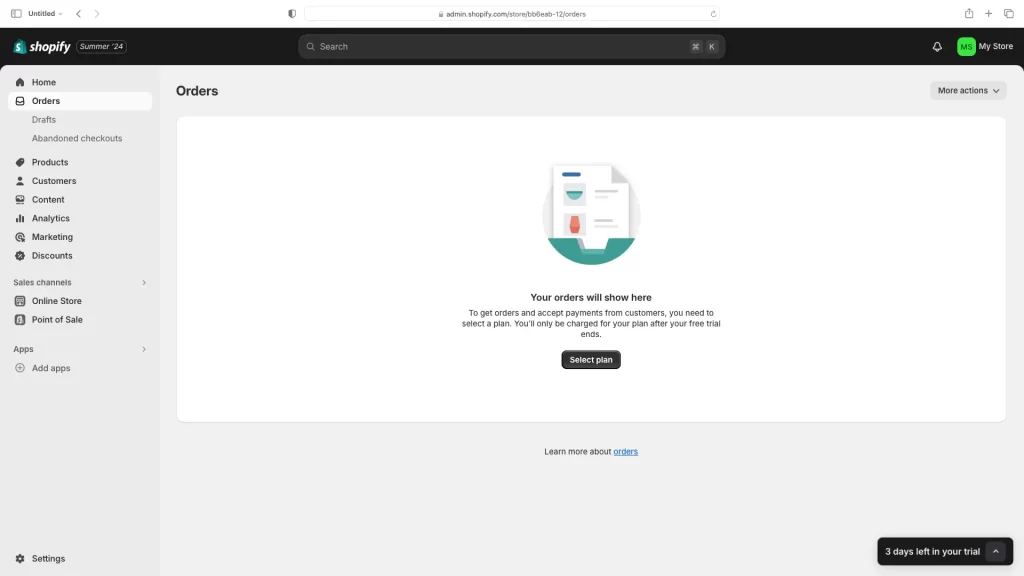
Orders: The Orders section is where you manage all customer orders, including:
- Order Management: View and process new orders, update order status, and print packing slips.
- Draft Orders: Create new orders manually and send invoices to customers.
- Abandoned Checkouts: Recover lost sales by viewing and managing abandoned carts, and sending follow-up emails to customers who didn’t complete their purchase.
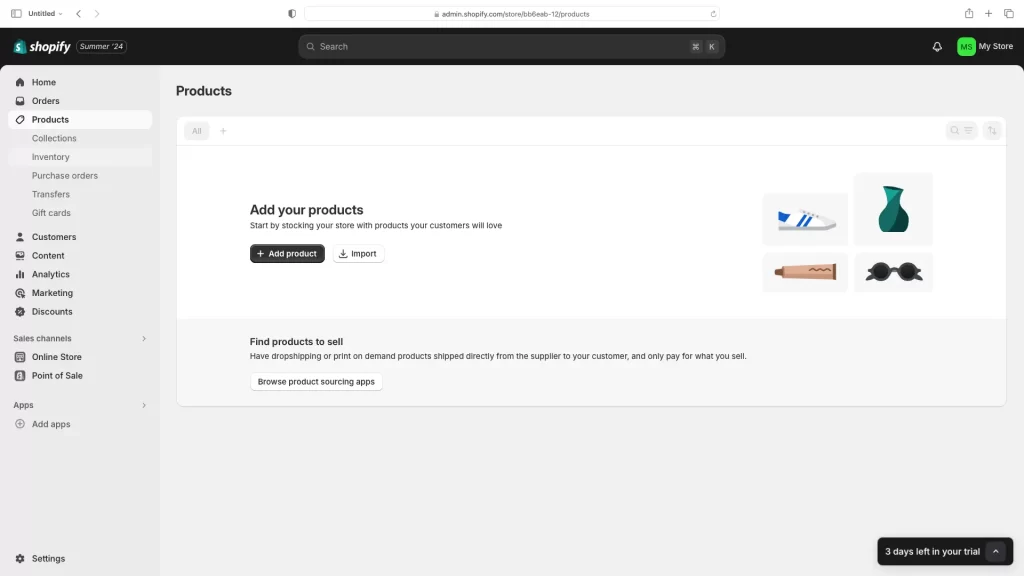
Products: The Products section allows you to manage your inventory:
- Add Products: Add new products by entering details like title, description, price, SKU, and images.
- Product Organization: Categorize products using collections, tags, and types to make them easier for customers to find.
- Inventory Management: Track stock levels, set inventory policies, and view product variants.
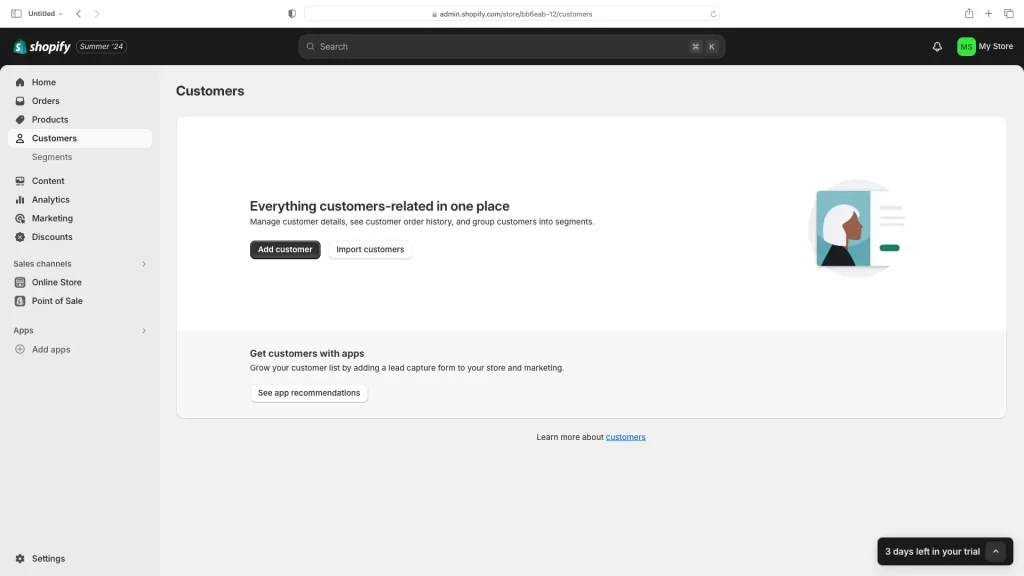
Customers: In the Customers section, you can manage your customer database:
- Customer List: View and manage all registered customers and their purchase history.
- Customer Groups: Segment customers into groups based on criteria like location, buying behavior, or custom tags.
- Customer Profiles: Access detailed profiles to see order history, communication logs, and account details.
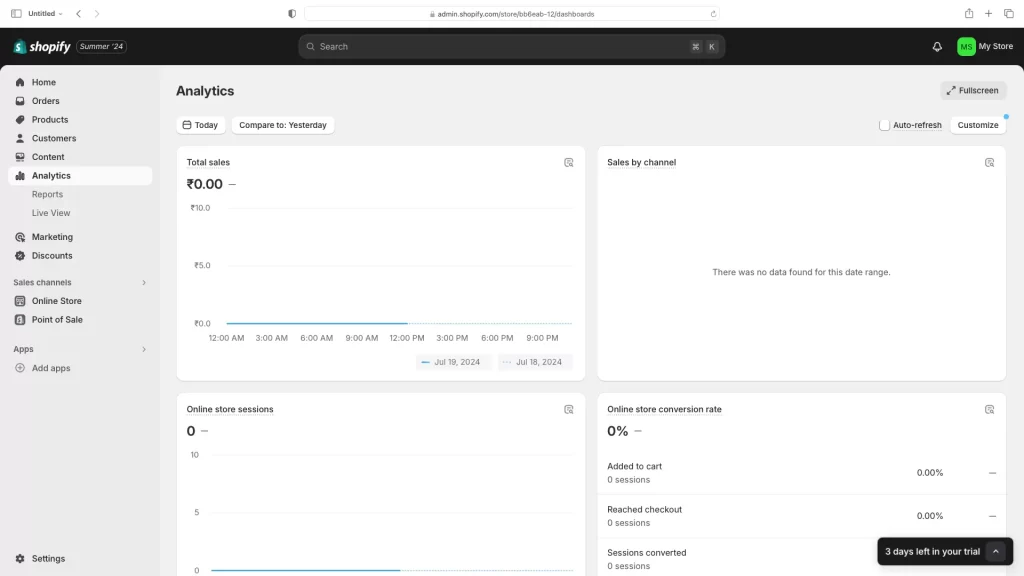
Analytics: The Analytics section provides in-depth insights into your store’s performance:
- Reports: Generate detailed reports on sales, customers, and product performance.
- Live View: Monitor real-time activity on your store, including current visitors and their actions.
- Dashboard: Access key performance indicators (KPIs) and trends over time.
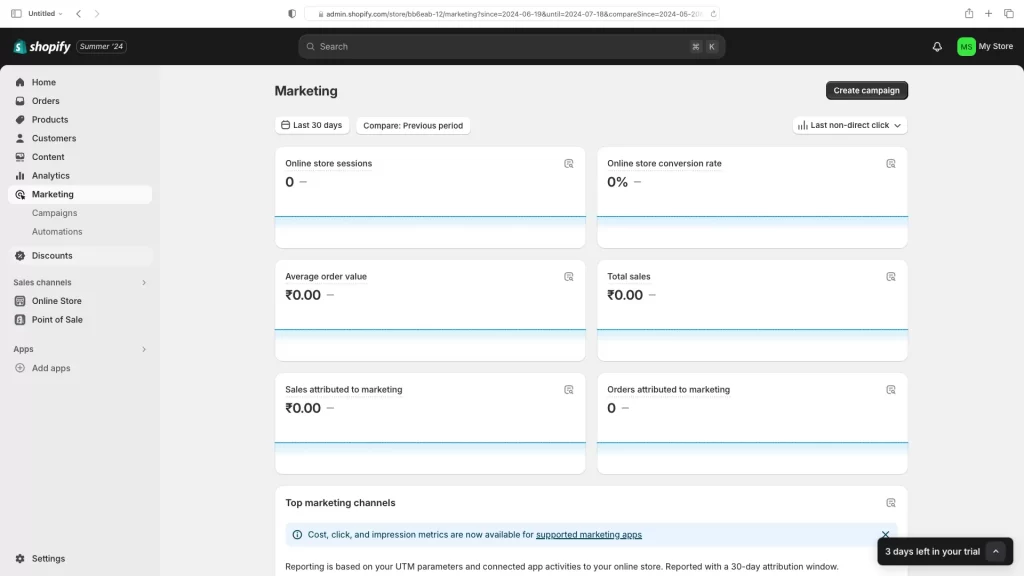
Marketing: The Marketing section helps you create and manage marketing campaigns:
- Campaigns: Set up and track email marketing, social media ads, and other promotional activities.
- Discounts: Create discount codes and automatic discounts to drive sales and reward loyal customers.
- Marketing Apps: Integrate third-party marketing apps to enhance your marketing efforts.
Discounts: Manage all your store’s discounts in this section:
- Discount Codes: Create unique discount codes that customers can apply at checkout.
- Automatic Discounts: Set up discounts that apply automatically based on conditions like order value or product purchase.

Apps: The Apps section is where you can extend your store’s functionality:
- App Store: Browse and install apps from Shopify’s App Store to add features like SEO tools, customer reviews, and shipping calculators.
- Manage Apps: View and configure installed apps to ensure they work seamlessly with your store.
Online Store: The Online Store section is where you customize your store’s appearance and content:
- Themes: Choose and customize your store’s theme to reflect your brand.
- Blog Posts: Create and manage blog content to engage with your audience and improve SEO.
- Pages: Add and edit static pages like About Us, Contact Us, and FAQ.
- Navigation: Set up your store’s menus and navigation structure.
- Domains: Manage your store’s domain name and configure domain settings.
Settings: The Settings section allows you to configure your store’s general settings:
- General: Set up your store’s basic information, including name, address, and time zone.
- Payments: Configure payment gateways and methods.
- Checkout: Customize the checkout process, including customer accounts, order processing, and additional checkout settings.
- Shipping and Delivery: Set up shipping rates, delivery methods, and carrier integrations.
- Taxes: Configure tax settings based on your business location and applicable regulations.
- Notifications: Manage email and SMS notifications sent to customers and staff.
- Files: Upload and manage files, such as images and documents, used in your store.
- Plan and Permissions: View your subscription plan and manage staff accounts and permissions.
.
Set Up Your Store:
.
How an added theme in Shopify:
- Adding a theme in Shopify is a straight forward process. Here’s a step-by-step guide to help you add a new theme to your Shopify store:
Log in to Your Shopify Admin:
- Go to your Shopify admin page by logging in at Shopify.
Go to Online Store:
- In the left-hand sidebar, click on “Online Store.” This will expand a menu where you can manage your themes.
Visit the Themes Section:
- Under “Online Store,” click on “Themes.” This will bring you to the Themes page where you can see your current theme and other theme options.

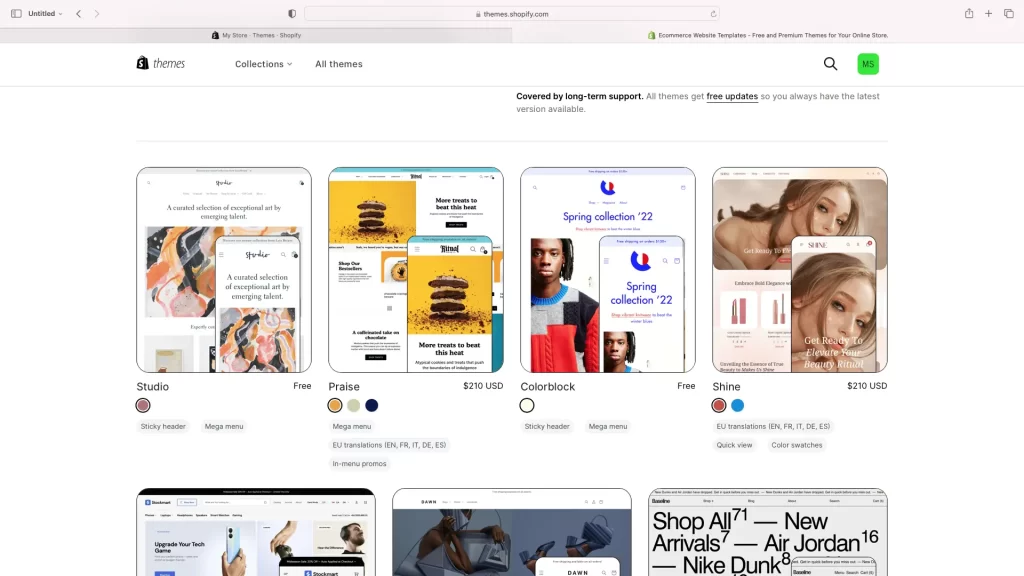
Explore the Shopify Theme Store:
- On the Themes page, click on the “Visit Theme Store” button to browse through the available themes. You can find both free and paid themes here.
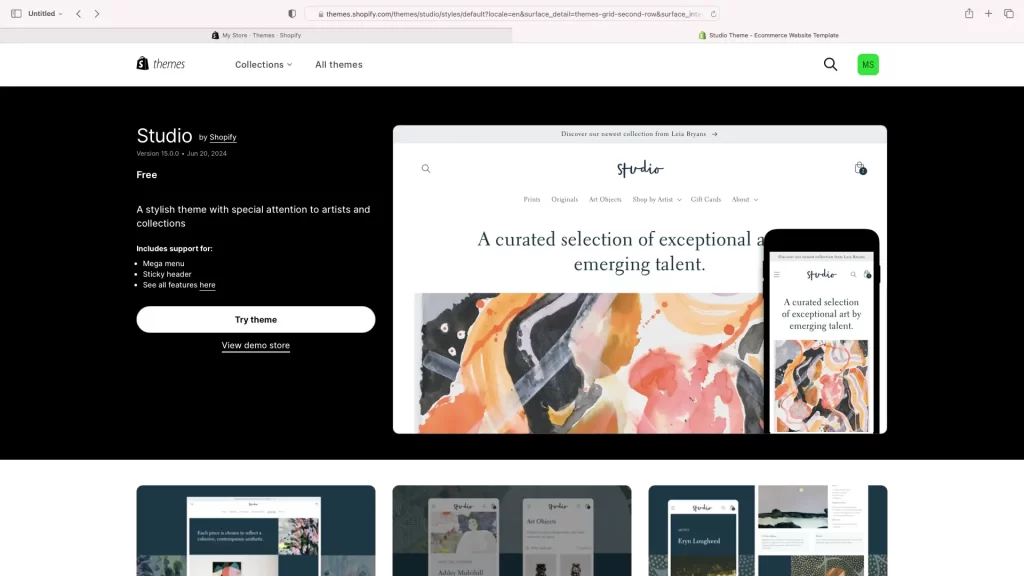
Select a Theme:
- Browse through the themes and select one that fits your store’s style and needs. You can preview themes to see how they will look on your store.
Add the Theme to Your Store:
- Once you find a theme you like, click on it, and then click on the “Add theme” button. For paid themes, you will need to purchase the theme before adding it to your store.
Publish the Theme:
- After adding the theme, it will appear in your Themes page under “More themes.” To publish it, click on “Actions” next to the theme, and then select “Publish.” This will make the new theme live in your store.
Customize the Theme:
- After publishing, you can customize the theme to fit your brand. Click on “Customize” next to the theme in the Themes page to open the theme editor. Here, you can adjust settings, add sections, and modify the design to suit your preferences.
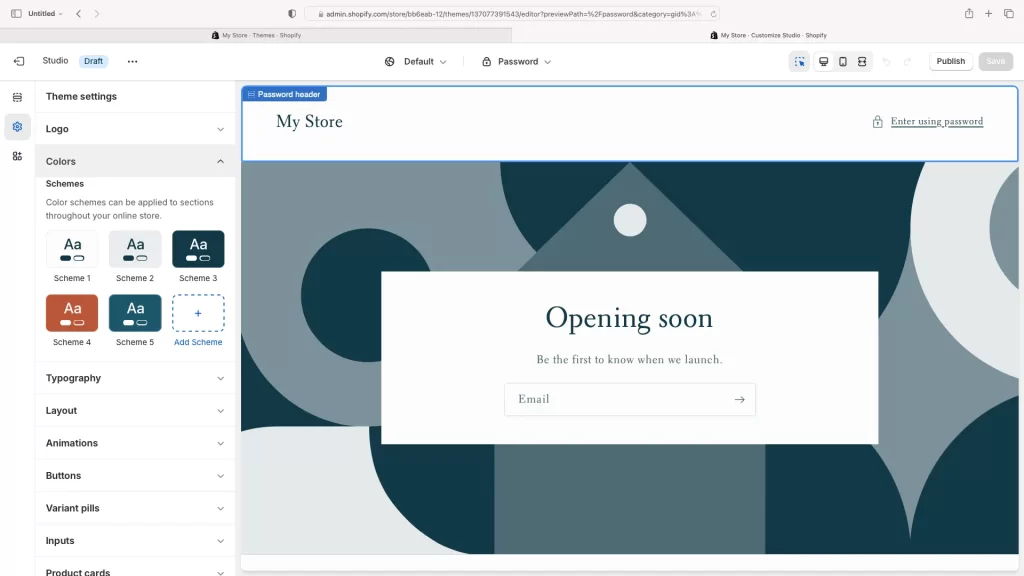
Save Your Changes:
- Once you’ve made your customizations, make sure to save your changes by clicking on the “Save” button in the theme editor.
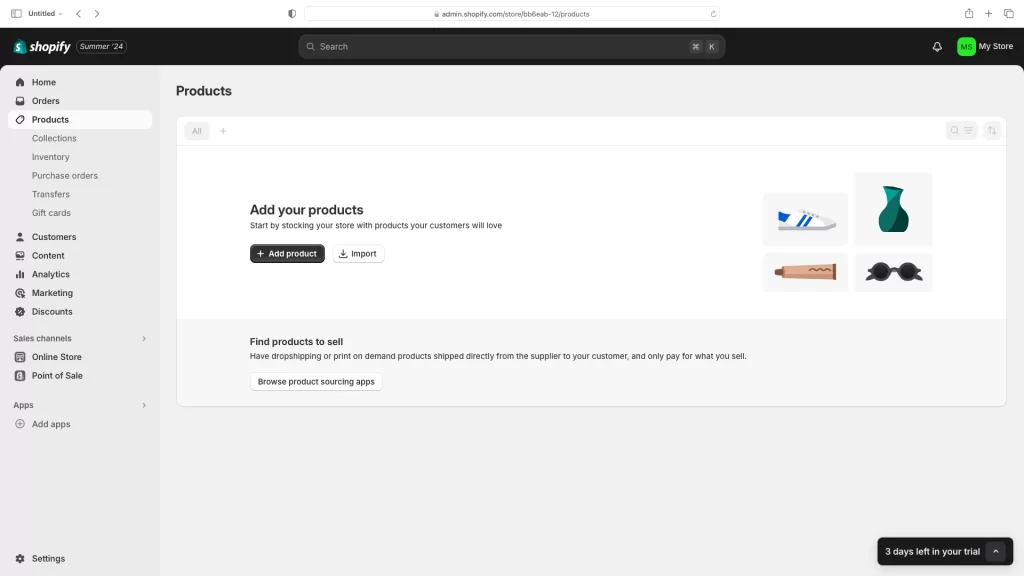
How did you add products to the Shopify store?
Adding products to your Shopify store is a fundamental step in setting up your online business. Here’s a detailed guide to help you through the process:
Log in to Your Shopify Admin Panel:
- Access Your Store: Open your web browser and log in to your Shopify account.
- Navigate to Products: In the left-hand sidebar, click on “Products.”
Add a New Product:
- Click Add Product: On the Products page, click the “Add product” button located in the upper right corner.
Enter Product Details:
- Title: Enter a clear and descriptive title for your product.
- Description: Write a detailed description of your product. Include information such as features, materials, usage instructions, and any other relevant details. Use bullet points and formatting to make the description easy to read.
Upload Product Images:
- Add Images: Click the “Add images” button to upload images of your product. You can upload multiple images to show different angles and details.
- Image Optimization: Ensure images are high quality and optimized for fast loading. Use descriptive file names for better SEO.
Set Pricing:
- Price: Enter the price you will charge customers for the product.
- Compare at Price: (Optional) Enter a higher price here if you want to show a discount. This price will be displayed as the original price with the current price showing as a discount.
- Cost per Item: (Optional) Enter the cost of the product. This is useful for tracking your profit margins.
Inventory Management:
SKU: Enter a unique Stock Keeping Unit (SKU) for inventory tracking.
Barcode (ISBN, UPC, GTIN, etc.): (Optional) Enter a barcode number if applicable.
Inventory Policy: Set the inventory policy for the product:
- Track quantity: Enable this option if you want Shopify to track the stock levels for this product.
- Quantity: Enter the number of items you have in stock.
- Allow overselling: Enable or disable this option based on whether you want to allow sales even if the product is out of stock.
Shipping:
- Physical Product: If this is a physical product that requires shipping, make sure the “This is a physical product” checkbox is checked.
- Weight: Enter the weight of the product, including packaging, as it affects shipping costs.
- Customs Information: (Optional) If you are shipping internationally, you may need to enter customs information such as HS codes and country of origin.
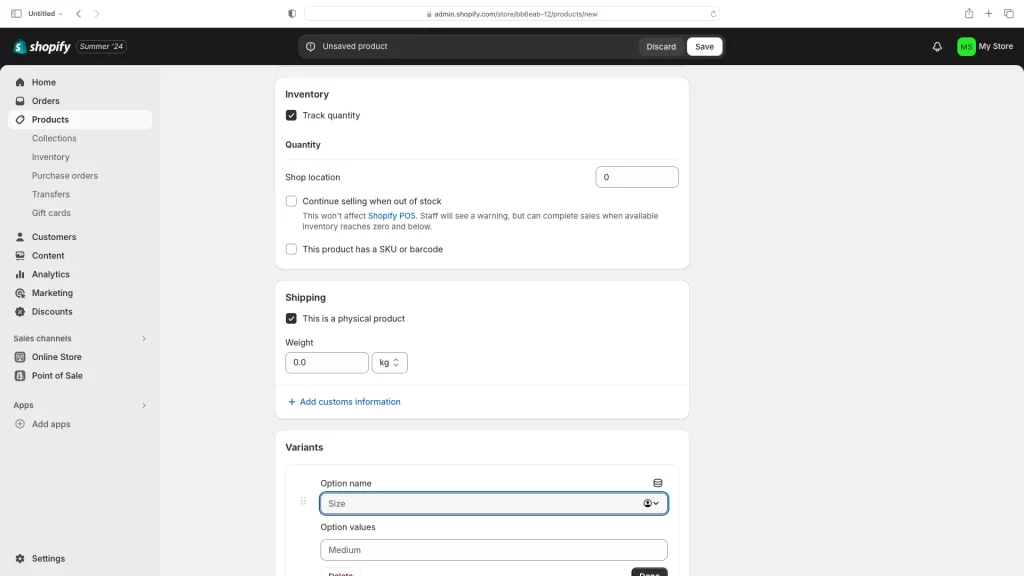
Variants:
- Add Variants: If your product comes in multiple options, such as sizes or colors, click “Add variants.”
- Options: Define the options (e.g., Size, Color) and add the respective values (e.g., Small, Medium, Large; Red, Blue, Green).
- Variant Details: Enter specific details for each variant, including price, SKU, and inventory.
Search Engine Listing Preview:
Edit Website SEO: Click “Edit website SEO” to modify the page title, meta description, and URL handle for better search engine optimization.
- Page Title: Ensure the title is descriptive and includes relevant keywords.
- Meta Description: Write a compelling meta description that summarizes the product and encourages clicks.
- URL and Handle: Customize the URL to be SEO-friendly, typically by using the product name.
Product Organization:
- Product Type: Enter a type for the product to categorize it (e.g., Apparel, Electronics).
- Vendor: (Optional) Enter the vendor or manufacturer of the product.
- Collections: Add the product to one or more collections to make it easier for customers to find.
- Tags: Add relevant tags to help organize and search for products within your admin and storefront.
Visibility and Sales Channels:
- Product Status: Set the product status to “Active” to make it visible to customers. Set it to “Draft” if you are not ready to publish it yet.
- Sales Channels: Select the sales channels where you want the product to be available, such as your online store, Facebook, or other connected channels.
Save Product:
- Save: Click the “Save” button at the top right corner to save all the product details.
Review and Publish:
- Preview: Review the product listing to ensure everything looks correct.
- Publish: If the product is ready, ensure its status is set to “Active” and it will be available in your store immediately.
.
How do you add a payment provider to Shopify?
To add a payment provider in Shopify, follow these steps:
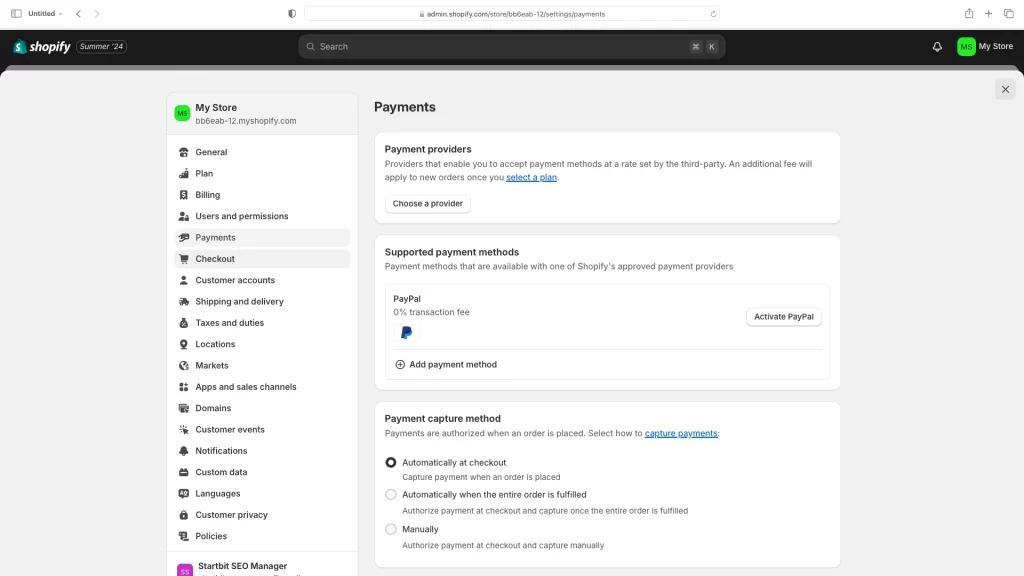
Log in to your Shopify Admin:
- Go to Shopify and log in with your credentials.
Navigate to Payment Settings:
- From your Shopify admin, go to Settings.
- On the Settings page, click on Payments.
Choose a Payment Provider:
- On the Payments section, you’ll see a list of available payment methods. To add a new payment provider, click on Choose a provider.
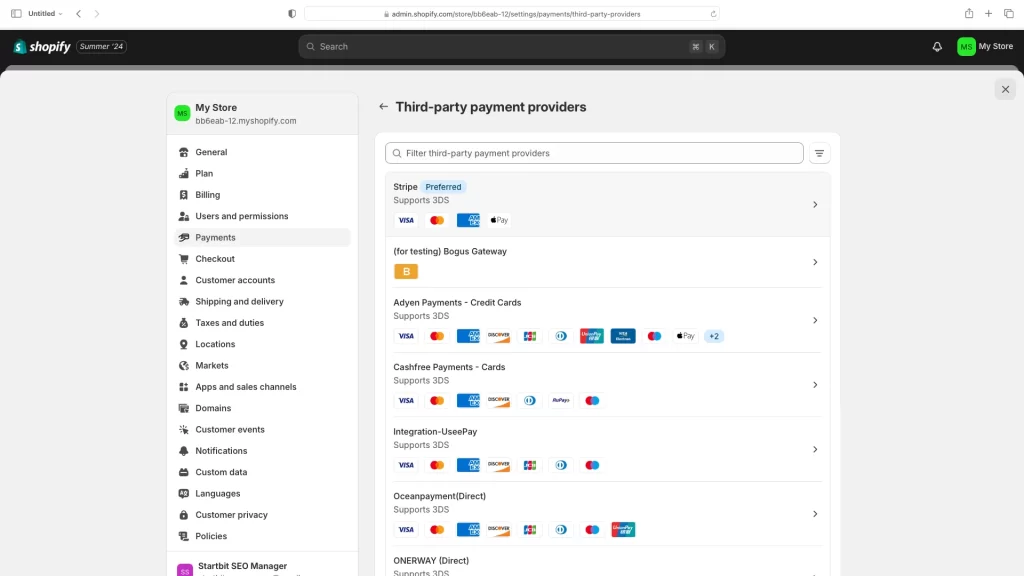
Select a Provider:
- You’ll see a list of popular payment providers. Select the one you want to add (e.g., Stripe, PayPal, Authorize.net).
- If your provider isn’t listed, you can use the Search function to find it.
Set Up the Provider:
- After selecting your provider, click Activate (or a similar button).
- You will be redirected to the provider’s setup page. Follow the instructions to connect your Shopify store with the payment provider. This typically involves logging into your account with the provider and authorizing Shopify to connect.
Enter Required Information:
- Fill in any required details such as API keys, account information, and other settings as needed.
Complete Setup:
- After entering all necessary information, click Complete Setup or a similar button to finish the process.
Test the Payment Method:
- It’s a good idea to test the new payment method to ensure everything is working correctly. You can do this by placing a test order on your store.
Save Changes:
- Once everything is set up and tested, make sure to save your changes.
How to configure shipping settings in the Shopify store?
Configuring shipping settings in Shopify involves several steps to ensure that your shipping options meet your business needs and customer expectations. Here’s a step-by-step guide:
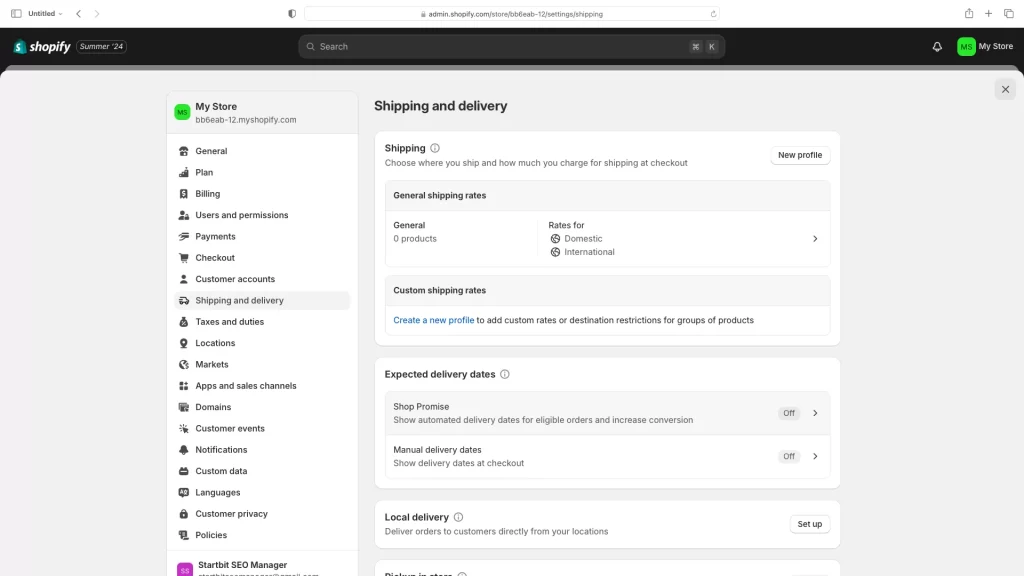
Access Shipping Settings:
- Log in to your Shopify admin panel.
- Go to Settings: Click on the “Settings” button at the bottom-left corner of your admin dashboard.
- Select Shipping and Delivery: Click on “Shipping and delivery”.
Configure Shipping Zones:
Create Shipping Zones: Click “Create shipping zone”.
- Name Your Zone: Enter a name for your shipping zone.
- Add Countries/Regions: Select the countries or regions you want to include in this zone.
Add Shipping Rates:
- Add Rate: Click “Add rate” next to the shipping zone.
- Set Rate Name: Enter a name for the rate (e.g., Standard Shipping, Express Shipping).
- Rate Type: Choose between a flat rate or a calculated rate.
- Set Price: Enter the price for this shipping method.
- Save: Click “Done” to save the rate.
Configure Domestic and International Shipping:
- Domestic Shipping: Repeat the process for setting up shipping zones and rates for your domestic market.
- International Shipping: If you plan to ship internationally, set up additional zones for the countries you want to ship to, and configure appropriate shipping rates.
Manage Carrier-Calculated Shipping (Optional):
Enable Carrier Calculations: If you use carriers like USPS, UPS, or FedEx, you can enable real-time carrier-calculated shipping.
- Third-Party Calculated Rates: In the “Shipping and Delivery” settings, go to the “Carrier accounts” section and connect your carrier accounts.
- Add Carrier Services: Once connected, add the carrier services you want to offer, and configure the rates accordingly.
Configure Shipping Profiles (Optional):
Create Shipping Profiles: Use shipping profiles to create custom shipping rules for different products.
- Add Profile: Click “Manage rates” and then “Create new profile”.
- Add Products: Select the products to include in this profile.
- Set Up Shipping Zones and Rates: Configure zones and rates for this profile as you did for general shipping settings.
Set Up Local Delivery or Pickup (Optional):
Local Delivery:
- Enable Local Delivery: In “Shipping and delivery,” find the “Local delivery” section and click “Manage”.
- Set Up Delivery Area: Define the area you will deliver to and set the delivery fee and minimum order value if applicable.
Local Pickup:
- Enable Local Pickup: In “Shipping and delivery,” find the “Local pickup” section and click “Manage”.
- Set Up Pickup Locations: Add and configure your pickup locations.
Review and Save Settings:
- Review Settings: Double-check all your shipping zones, rates, and profiles to ensure they are set up correctly.
- Save Changes: Click “Save” to apply your shipping settings.
Test Your Shipping Rates:
- Place Test Orders: Create test orders to verify that the shipping rates and options are working as expected.
By following these steps, you can configure your Shopify store’s shipping settings to match your business needs and provide a seamless experience for your customers.
Configure Tax Settings in Shopify:
.
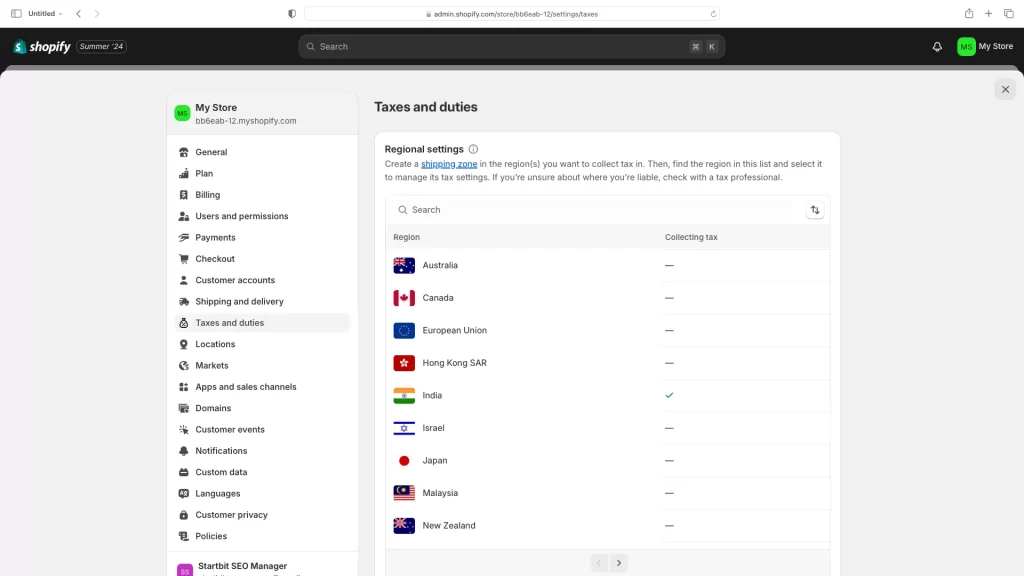
Log in to Your Shopify Admin:
- Go to your Shopify admin dashboard.
Navigate to Taxes and Duties:
- From your Shopify admin, go to Settings.
- Click on Taxes and Duties.
Set Up Tax Regions:
- In the Tax Regions section, you can set up tax rates for different regions (countries and their subdivisions).
- Click on the region where you want to set up taxes.
Configure Taxes for Specific Countries:
- If you sell internationally, click on the country you want to set up taxes for.
- Enter the tax rates for the country and its subdivisions if applicable.
- Save your changes.
Set Up Automatic Tax Calculations:
- Shopify supports automatic tax calculations for certain regions like the United States, Canada, the European Union, and others.
- For these regions, you can enable automatic tax settings by toggling the switch on. Shopify will then calculate the taxes automatically based on the customer’s location.
Include or Exclude Taxes in Prices:
- Decide whether you want to include taxes in your product prices or add them at checkout.
- Under the Tax Calculations section, you can check the option All prices include tax if you want your prices to include taxes.
- If you leave it unchecked, taxes will be added at checkout.
Tax Shipping Rates:
- You can decide if you want to charge taxes on shipping.
- Under Tax calculations, check Charge tax on shipping rates if applicable.
Tax Overrides and Exemptions:
- If you need to create specific tax rules for certain products or collections, use the Tax overrides section.
- Click on Manage tax overrides to create rules for products that should have different tax rates.
Save Your Settings:
- After making all necessary adjustments, make sure to save your settings.
Customize Your Store Further:
Enhance your store’s functionality and user experience with additional customization:
- Install Apps: Explore Shopify’s app store to find applications that extend your store’s capabilities. Popular apps include SEO tools, social media integrations, and customer support solutions.
- Optimize for SEO: Improve your store’s visibility in search engines by optimizing product titles, descriptions, meta tags, and URLs.
.
Set Up Domain and Email:
.
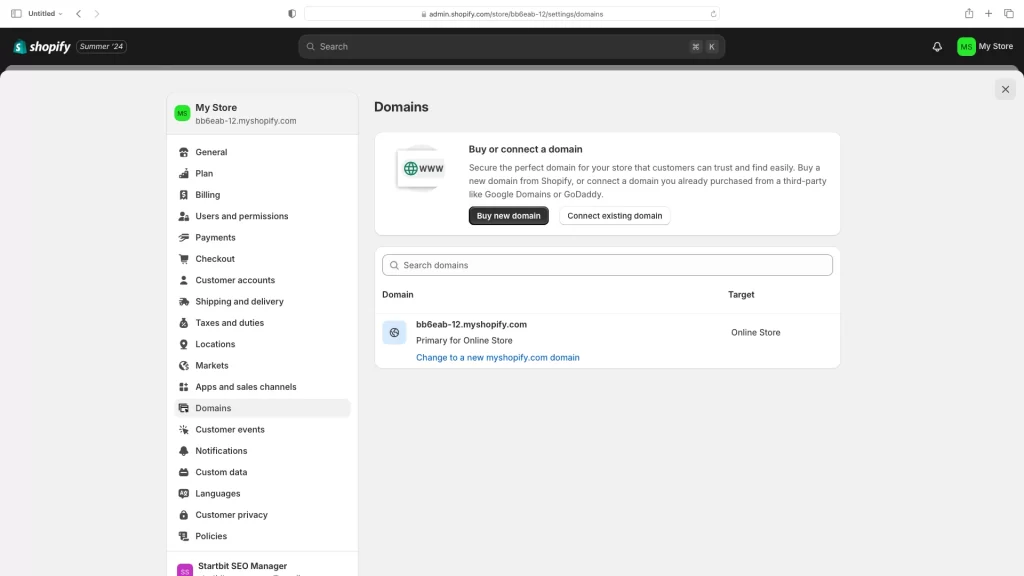
Purchase a Domain:
- If you don’t already have a domain, you can purchase one directly from Shopify or another domain provider.
Connect an Existing Domain:
- Go to your Shopify admin panel.
- Click on “Settings” at the bottom of the left-hand menu.
- Select “Domains”.
- Click “Connect existing domain”.
- Enter your domain name and follow the prompts.
Update DNS Settings:
- If you purchased your domain from a third-party provider, you’ll need to update your DNS settings.
- Log into your domain provider’s account.
- Find the DNS settings or DNS management area.
Create a new CNAME record:
- Name/Host/Alias: www
- Value/Destination/Target: shops.myshopify.com
Update the A record:
- Name/Host/Alias: @ or leave it blank
- Value/Destination/Target: Shopify’s IP address (you can find this in your Shopify admin panel under “Domains”).
Verify Connection:
- Return to the Shopify admin panel and click “Verify connection” to ensure everything is set up correctly.
Setting Up Email Forwarding:
.
Set Up Email Forwarding (Shopify Domain):
- If you purchased your domain through Shopify, you can set up email forwarding directly.
- Go to your Shopify admin panel.
- Click on “Settings” and then “Domains”.
- Select the domain you want to set up email forwarding for.
- Click “Add email forwarding”.
- Enter the email address you want to forward (e.g., info@yourdomain.com) and the destination email address (e.g., your personal email).
Set Up Email Forwarding (Third-Party Domain):
- If you purchased your domain from a third-party provider, you’ll need to use their email forwarding service or set up custom email hosting.
- Log into your domain provider’s account.
- Find the email settings or email management area.
- Set up email forwarding from there.
- Alternatively, you can use a third-party email hosting service like Google Workspace or Zoho Mail.
Setting Up Custom Email Hosting:
Choose an Email Hosting Provider:
- Select a provider like Google Workspace, Zoho Mail, or any other that supports custom domain emails.
Verify Your Domain:
- Follow the email hosting provider’s instructions to verify your domain. This usually involves adding a TXT record to your DNS settings.
Set Up MX Records:
- Log into your domain provider’s account.
- Find the DNS settings or DNS management area.
- Add the MX records provided by your email hosting provider.
Create Email Accounts:
- Follow the instructions provided by your email hosting provider to create custom email accounts.
Testing
Domain Connection:
- Visit your domain in a web browser to ensure it’s correctly pointing to your Shopify store.
Email Forwarding:
- Send a test email to your new custom email address to ensure it forwards correctly.
.
Test Your Store Before Going Live:
Before launching your Shopify store, it is crucial to thoroughly test its functionality to ensure everything works smoothly. Here are detailed steps to help you conduct comprehensive testing:
Place Test Orders:
Placing test orders is essential to verify that your payment processing, shipping calculations, and order fulfillment are working correctly.
Step-by-Step Process:
a. Enable Test Mode for Payments:
- Navigate to your Shopify admin panel.
- Go to “Settings” > “Payments.”
- If you are using Shopify Payments, click “Manage” and then enable test mode. For other payment gateways, refer to their documentation for test mode instructions.
b. Create Test Orders:
- Go to your store and add products to the cart.
- Proceed to checkout and select different payment methods to ensure they all function correctly.
- Verify that the payment process is smooth and that there are no errors during checkout.
c. Test Shipping Calculations:
- In the checkout process, enter different shipping addresses to test shipping rate calculations.
- Ensure that the rates displayed are accurate and match your configured shipping settings.
- Test various shipping options to ensure they are available and correctly priced.
d. Complete the Order:
- Complete the test order and verify that you receive an order confirmation.
- Check your Shopify admin panel to ensure the order appears correctly.
- Verify that inventory levels are updated according to the order.
e. Fulfill the Order:
- Mark the test order as fulfilled in your admin panel.
- Verify that the fulfillment process works as expected and that the order status is updated accordingly.
Launch Your Store:
Once you’re confident in your store’s setup and testing is complete, it’s time to launch:
- Promote Your Store: Announce your store’s launch on social media channels, email newsletters, and relevant online communities.
- Monitor initial feedback and make any necessary adjustments based on customer responses.
Monitor Performance and Optimize:
Track your store’s performance using Shopify’s analytics tools and make data-driven decisions:
- Monitor sales metrics, customer behavior, and traffic sources.
- Continuously optimize your store based on insights to improve conversions and customer satisfaction.
.
How long does it take to set up a Shopify store?
Setting up a Shopify store can be an exciting venture for anyone looking to start an online business. However, understanding the time required for setup is crucial for planning and managing your expectations. Here’s a comprehensive guide to help you understand the timeline involved.
Understanding the Shopify Setup Process
The time it takes to set up a Shopify store largely depends on your preparedness and familiarity with the platform. If you’re new to Shopify, expect to invest some time in learning the basics. On average, setting up a basic store can take anywhere from a few hours to several days.
Initial Setup: Account Creation and Basic Configuration
The first step is creating your Shopify account. This process is straightforward and usually takes just a few minutes. After registration, you’ll need to configure basic settings such as store name, currency, and payment methods. This initial setup generally takes between 30 minutes to an hour.
Designing Your Store: Choosing a Theme and Customizing
Choosing and customizing your store’s theme is one of the most time-consuming aspects. Shopify offers a variety of themes, both free and paid. Selecting a theme that fits your brand can take a few hours. Customizing it to match your brand’s identity—adjusting colors, fonts, and layout—can take additional time. Expect this phase to take anywhere from a few hours to a couple of days.
Adding Products: Uploading and Organizing Inventory
Adding products to your store involves several steps. You’ll need to upload product images, write descriptions, set prices, and categorize items. If you have a large inventory, this step could take several days. For a smaller store, it might be completed in a few hours. Efficient product management is crucial for a smooth shopping experience.
Configuring Additional Features: Apps and Integrations
Shopify’s App Store offers a range of apps to enhance your store’s functionality. Integrating these apps—such as email marketing tools, social media plugins, or inventory management systems—can vary in time depending on the complexity and number of integrations. This step may take a few hours to a day or more.
Testing and Launching: Ensuring Everything Works Smoothly
Before officially launching your store, it’s important to test its functionality. Check payment gateways, shipping options, and overall user experience. This phase ensures that everything works correctly and can take a few hours. It’s advisable to do a thorough check to avoid any issues post-launch.
.
How do Startbit Solutions help your Shopify store?
Running an online store on Shopify can be incredibly rewarding, but optimizing its performance and functionality can be challenging. Startbit Solutions offers a range of services designed to enhance your Shopify store and boost your business’s success. Here’s how Startbit Solutions can help you achieve your e-commerce goals.
- Store Setup and Configuration: We can help you set up your Shopify store, including configuring your settings, selecting a theme, and adding essential apps and features.
- Custom Design and Development: If you need a unique design or functionality that isn’t available through standard themes or apps, we can create custom themes or develop bespoke features tailored to your business needs.
- Integration: We can integrate your Shopify store with other systems, such as CRM platforms, email marketing tools, or inventory management systems, ensuring a seamless flow of information and improved efficiency.
- Optimization: To enhance your store’s performance, we can optimize your website’s speed, SEO, and user experience, helping to improve search engine rankings and conversion rates.
- Support and Maintenance: We offer ongoing support and maintenance services to resolve any issues that arise, update your store with the latest features, and ensure everything runs smoothly.
- Consulting and Strategy: Our team can provide strategic advice on best practices for Shopify, including guidance on marketing, sales strategies, and store management.
Conclusion:
Setting up a Shopify store can be a manageable and rewarding process with the right preparation and support. While the initial setup can be completed within a few hours, additional steps like design customization, product uploads, and feature integrations might extend the timeline to several days. Thorough testing is crucial to ensure a smooth launch.
For those seeking professional assistance, Startbit IT Solutions offers comprehensive services to optimize and enhance your Shopify store. From initial setup and custom development to integration, optimization, and ongoing support, Startbit Solutions is equipped to help you navigate the complexities of e-commerce and achieve your business goals. Partnering with experts can save you time and ensure your store runs efficiently, ultimately driving your success in the online marketplace.